
Unit-2: Database backup and CSV handling:

Unit-2: Database backup and CSV handling:
2.1 SQLite dump :
2.1.1 Dump specific table into file, Dump only table structure
2.1.2 Dump entire database into file
2.1.3 Dump data of one or more tables into a file
2.2 CSV files handling:
2.2.1 Import a CSV file into a table
2.2.2 Export a CSV file from table
NOTES
📘 2.1 SQLite Dump – A Complete Guide
🔷 What is an SQLite Dump?
An SQLite dump is a way to export the entire database—including tables, structure, and data—into a plain text file containing SQL statements. This file can later be used to restore or copy the database.
Think of it like a backup of your database in the form of SQL code.
🔹 Why Use SQLite Dump?
✅ Backup: Save the current state of the database.
✅ Migration: Move database to another system or version.
✅ Versioning: Keep snapshots during development.
✅ Sharing: Share the schema and data with others using a simple file.
🔹 What’s Inside a Dump File?
An SQLite dump file contains:
CREATE TABLEstatements to define table structure.INSERT INTOstatements to store the actual data.Commands to recreate indexes, triggers, and views.
🔹 How to Create an SQLite Dump?
✅ Using SQLite Command-Line Tool
Basic Syntax:

Explanation:
sqlite3: The SQLite command-line program.your_database.db: The database file to back up..dump: A special command to generate SQL output.>: Redirects the output into a file calledbackup.sql.
🔹 How to Restore from a Dump File?
You can load the dump into a new or existing database.
✅ Command:

🔹 Export Only Table Structure (Without Data)
You can exclude the data and just export the structure using .schema:

🔹 Export a Specific Table (Optional)
To dump a specific table:

| 🔹 Task | 💻 Command Example |
|---|---|
| Dump entire database | sqlite3 mydb.db .dump > backup.sql |
| Dump and compress (Linux) | sqlite3 mydb.db .dump | gzip > backup.sql.gz |
| Restore database | sqlite3 newdb.db < backup.sql |
| Dump only structure (no data) | sqlite3 mydb.db .schema > structure.sql |
📝 Key Notes
Dump files are text-based and can be opened in any editor.
Great for portability and easy database transfer.
Useful in git-based version control for tracking DB schema changes.
Be cautious: the dump includes everything—data, structure, and triggers.
🔍 Real-Life Use Case
A developer working on an application wants to back up their SQLite database before making major changes. They use .dump to export the current database to a .sql file, make changes in the app, and later use the file to restore the original data if needed.
📘 Dumping Specific Table & Table Structure in SQLite
SQLite offers flexible options to export (or “dump”) either the entire database, a specific table, or just the table structure (schema). These features are useful when you want to backup, share, or migrate only certain parts of your database.
🔹 1. Dumping a Specific Table into a File
✅ Purpose:
Sometimes, you don’t need the entire database—only one table. Dumping a specific table allows you to export its data and structure separately.
✅ Command Syntax:
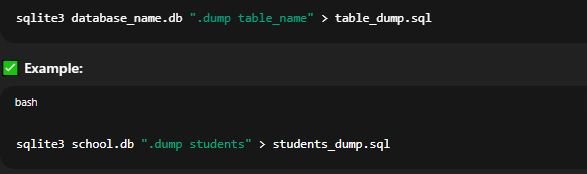
✅ What Happens:
A file named
students_dump.sqlis created.It includes SQL statements to:
Recreate the table
studentsInsert all its data using
INSERT INTOstatements
✅ Use Cases:
Sharing only one table with another developer
Exporting a table to import into another project
Backing up a single critical table without dumping the full database
📝 Important Tips:
Replace
studentswith your desired table name.Make sure the table exists, or you’ll get an empty or error result.
🔹 2. Dumping Only the Table Structure (Schema)
✅ Purpose:
At times, you may only want to export the structure of tables (i.e., column names, data types, and constraints) without any of the data. This is useful for creating a new database with the same design.
✅ Command Syntax:
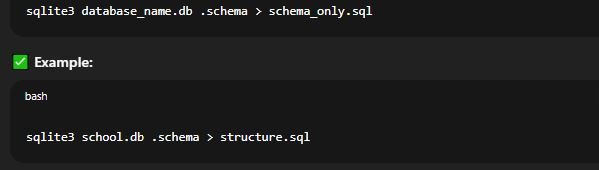
✅ What Happens:
The file
structure.sqlis created.It contains:
All
CREATE TABLEstatementsDefinitions of indexes, views, or triggers (if any)
No
INSERT INTOstatements are included—no data is exported.
🔹 Dumping Structure of a Single Table Only
If you only want the structure of one specific table:
✅ Command:
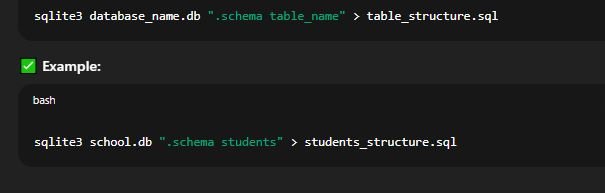
| 📌 Task | 💻 SQLite Command |
|---|---|
| Dump entire database | sqlite3 db.db .dump > full_dump.sql |
| Dump specific table | sqlite3 db.db ".dump tablename" > table_dump.sql |
| Dump only schema | sqlite3 db.db .schema > schema.sql |
| Dump schema of one table | sqlite3 db.db ".schema tablename" > table_schema.sql |
✅ Real-Life Use Case
Imagine a situation where a developer is working on a large e-commerce app. They want to give another teammate access to just the products table for redesigning it. Instead of sharing the full database, they simply run:

📝 Key Takeaways:
Use
.dumpfor full or partial table data and structure.Use
.schemafor structure only, no data.These features simplify backup, migration, and collaboration.
📘 Dumping Entire Database into a File in SQLite
🔹 What is Database Dumping?
Dumping a database means creating a text-based backup of the entire database, including:
All table structures (schemas)
All data entries
All SQL commands to recreate the database exactly as it is
This dump file can later be used to restore the database or move it to another system.
🔹 Why Dump a Database?
| 📌 Reason | 🎯 Purpose |
|---|---|
| 🔄 Backup | Secure a copy in case of accidental data loss |
| 💻 Migration | Transfer database to a new server or system |
| 🛠️ Development | Share a sample database with another developer |
| 🧪 Testing | Use a copy of real data for testing new features |
🔹 How to Dump an Entire SQLite Database
SQLite provides a simple command using the sqlite3 utility:
✅ Command Syntax:
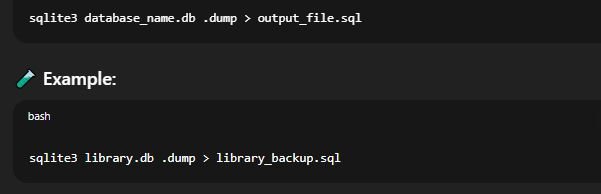
✅ What Happens:
The command exports:
CREATE TABLEstatements (structure)INSERT INTOstatements (data)Any views, indexes, or triggers
The file
library_backup.sqlcontains the full database in SQL script format.
🔹 How to Restore the Dumped Database
You can recreate the entire database using the .sql file:
✅ Restore Command:

| 📌 Task | 💻 Command Example |
|---|---|
| Dump entire DB | sqlite3 mydata.db .dump > backup.sql |
| Restore from dump | sqlite3 newdata.db < backup.sql |
| View dump on screen | sqlite3 mydata.db .dump |
✅ Important Tips
Make sure
sqlite3is installed and accessible in your system path.Always double-check the dump file to ensure it’s not empty.
Run the dump when no one else is modifying the database to avoid incomplete data.
🔒 Security Note
Never share a database dump that contains sensitive user data or passwords in plain text unless:
It’s cleaned or anonymized.
You trust the recipient.
📂 Real-Life Use Case
Suppose a developer named Riya is working on a mobile app that uses an SQLite database called app_data.db. Before adding new features, she wants to keep a backup of her current database:
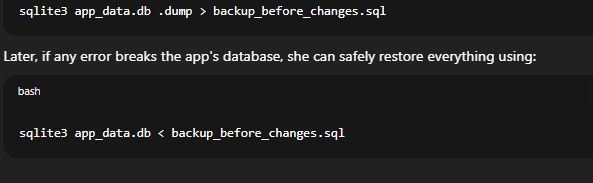
📝 Conclusion
Dumping a database is a safe and essential practice for backup, sharing, or migration. It ensures your data and design are preserved and recoverable at any time.
Regular backups can save you hours of frustration during system failures or code errors!
📘 Dumping Data of One or More Tables into a File in SQLite
🔹 What is Table Dumping?
In SQLite, table dumping refers to the process of exporting the structure and/or data of specific tables into a file. This is helpful when you don’t need the entire database, but just a part of it—like one or a few tables.
🔹 Why Dump Only Specific Tables?
| 🔹 Reason | 💡 Use Case Example |
|---|---|
| 🔹 Save storage space | Export only required tables instead of full database |
| 🔹 Faster data migration | Move only necessary data to another system |
| 🔹 Development and testing | Share only sample tables with team members |
| 🔹 Secure sharing | Avoid exporting sensitive data from other tables |
🔹 Methods to Dump Specific Table(s)
Unlike full database dumps, SQLite doesn’t provide a built-in direct command like .dump table1 for only data. But there are several ways to extract the desired output:
✅ Method 1: Use .dump Command with Table Name (Structure + Data)
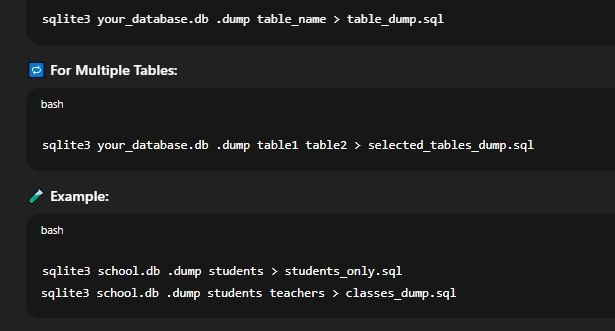
✔ This will export:
CREATE TABLEstatement(s)INSERT INTOdata for specified table(s)
✅ Method 2: Export Only Data (No Table Structure)
To export just the data (without schema), use SQL + .output:
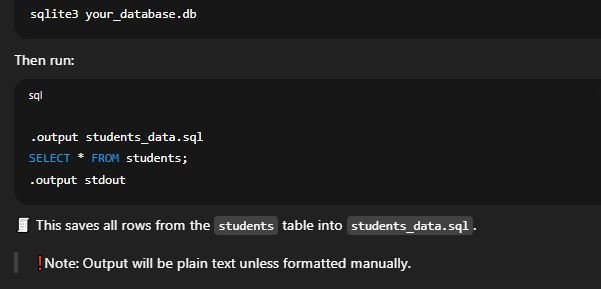
🔹 Custom Format Output (CSV, TSV, etc.)
You can also export data in other formats, such as CSV:
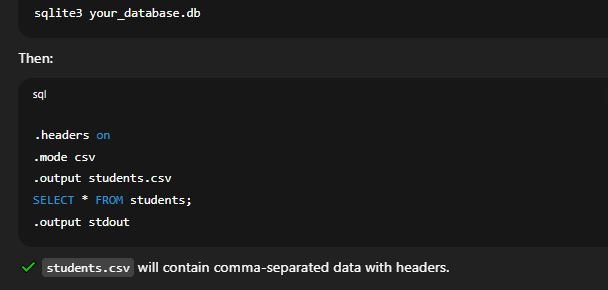
| 📂 Purpose | 💻 Command / Method |
|---|---|
| Dump structure + data of 1 table | .dump table_name > file.sql |
| Dump multiple tables | .dump table1 table2 > file.sql |
| Dump only data (plain text) | .output file.sql + SELECT * FROM table_name; |
| Export as CSV | .mode csv + .output file.csv + SELECT * FROM table_name; |
✅ Best Practices
🧪 Test the dump file by opening it in a text editor before using it for restoration.
🧾 Always include column headers if exporting to CSV or TXT.
💾 Use meaningful filenames like
students_2025_backup.sqlfor clarity.🔒 Remove confidential data if sharing with others.
🧠 Real-World Example
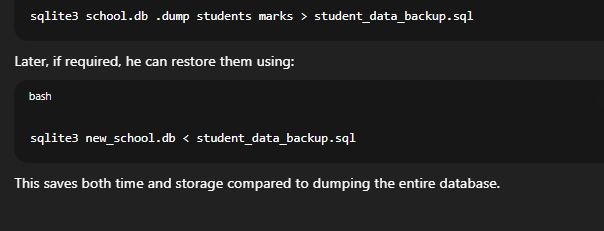
Let’s say Rahul is developing a student portal and only needs to back up the ‘students’ and ‘marks’ tables from his school.db database:
📄 CSV Files Handling in SQLite
CSV (Comma-Separated Values) is a simple and widely used format for storing tabular data in plain text. SQLite supports importing and exporting CSV files, which is especially useful for data migration, backup, analysis, and reporting.
🔹 What is a CSV File?
A CSV file is a plain text file where:
Each line represents a row of data.
Columns are separated by commas.
No special formatting or metadata is used.
Example:

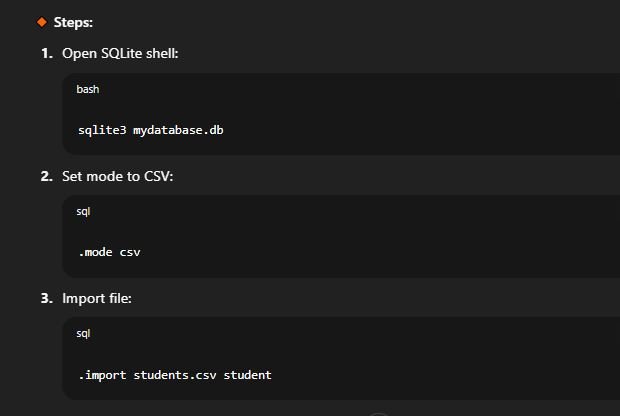
🔹 Importing CSV Data into SQLite
You can import data from a CSV file into a SQLite table using the .import command in the SQLite command-line interface (CLI).
🔸 Syntax:

🔹 Exporting SQLite Table to CSV
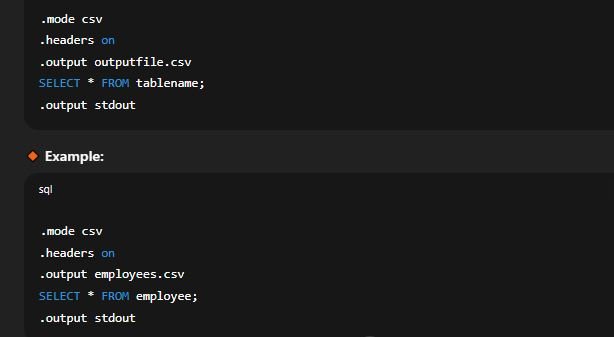
You can export data from a table into a CSV file using the .mode csv and .output commands.
🔸 Syntax:
🔹 Advantages of Using CSV in SQLite
Simplicity: Easy to create and read using any text editor or spreadsheet software.
Portability: Can be used across databases, platforms, and tools.
Speed: Fast import/export of large datasets.
Integration: Useful in integrating SQLite with Excel, Python, R, and other tools.
🔹 Important Points
Ensure proper data types and table schema match with the CSV data.
Avoid commas inside values or enclose such values in double quotes.
Use
.headers onto include column names during export.Always validate the data after import/export for accuracy.
| ✅ Task | 💻 Command Example |
|---|---|
| Set CSV mode | .mode csv |
| Enable headers | .headers on |
| Import CSV to table | .import file.csv tablename |
| Export table to CSV | .output file.csv + SELECT * FROM tablename; |
| Reset output to terminal | .output stdout |
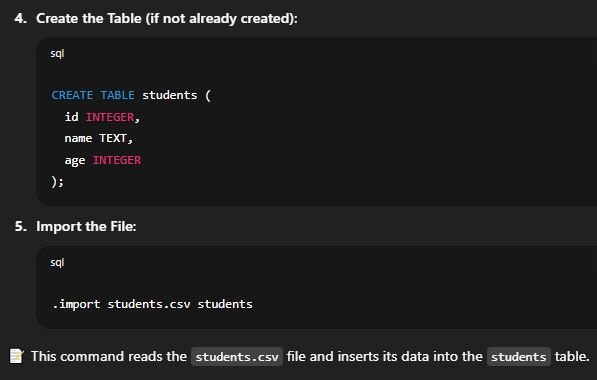
📥 Importing a CSV File into a Table in SQLite
CSV (Comma-Separated Values) files are a common format used to store tabular data. SQLite provides a convenient method to import such data into a database table using its command-line interface. This is especially useful for transferring data from spreadsheets or other software into an SQLite database.
🔹 What is CSV File Import?
Importing a CSV file into a SQLite table means taking the data from a .csv file and inserting it into a table inside a .db SQLite database file. Each line in the CSV represents a row, and each comma-separated value corresponds to a column.
🧰 Requirements Before Importing
Existing SQLite Database: The database must be created before import.
Table Prepared: The table structure (columns and types) should match the CSV data.
Proper CSV Format:
Commas separate values.
Optional header row (column names).
Text values enclosed in quotes if they contain commas.
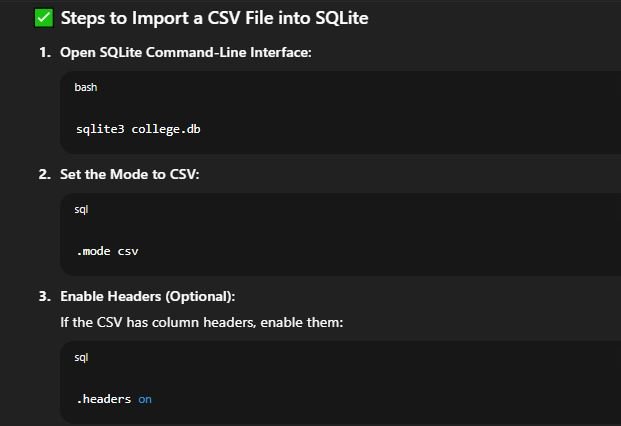
🧪 Example CSV File (students.csv)

| ⚠️ Issue | 💡 Tip |
|---|---|
| Data mismatch | Ensure column types match the data in the CSV |
| Comma inside data | Use quotes in CSV values to avoid split issues |
| Table not found | Create the table before importing |
| File path error | Provide full path if file is in another directory |
📌 Points to Remember
.mode csvis required before importing.Headers should match the table structure.
File must be accessible from the directory where the SQLite shell is running.
To import with headers ignored, skip
.headers on.
📂 Real-Life Use Cases
Importing student or employee records.
Migrating data from Excel/Google Sheets to SQLite.
Integrating with data analysis tools like Python or R.
| 📌 Command | 📝 Purpose |
|---|---|
.mode csv |
Set mode for CSV import |
.headers on |
Use headers from CSV file |
.import filename.csv tablename |
Import data into specified table |
📤 Exporting a CSV File from a Table in SQLite
Exporting data from a SQLite table into a CSV (Comma-Separated Values) file is a common operation when we want to use that data in spreadsheet applications like Microsoft Excel, Google Sheets, or data analysis tools. SQLite provides a built-in and efficient method for exporting data using its command-line interface.
🔍 What is CSV Export?
A CSV export operation takes the data from a database table and writes it into a .csv file. Each row in the table becomes a line in the file, and each column value is separated by a comma. It allows for easy sharing, viewing, and further processing of structured data.
🧰 Requirements Before Exporting
SQLite installed and accessible via command line.
A database (
.dbfile) containing at least one populated table.Proper file permissions to write the CSV file in the chosen directory.
🔧 Steps to Export a Table to CSV in SQLite
Let’s say we have a table called students in a database named college.db.
1. Open the SQLite Command-Line Interface

2. Set Mode to CSV
Before exporting, set the output format to CSV:

3. Enable Column Headers (Optional)
To include column names as the first row:

4. Specify Output File
Tell SQLite where to save the output:

5. Write Data to File
Run a SELECT statement to fetch and write the data

6. Reset Output
After export is done:

| ⚠️ Mistake | 💡 Solution |
|---|---|
| File not created | Ensure .output is set before running SELECT |
| Data not exported | Check if table has rows |
| Headers missing | Use .headers on before export |
| Output still redirected | Use .output stdout after finishing export |
📝 Use Cases for Exporting CSV Files
Sharing data with non-technical users.
Importing SQLite data into Excel or Google Sheets.
Backing up specific tables.
Transferring table data to other databases or applications.
| 📋 Command | 🎯 Purpose |
|---|---|
.mode csv |
Set output format to CSV |
.headers on |
Include column names |
.output filename.csv |
Save output to a CSV file |
SELECT * FROM table; |
Extract table data |
.output stdout |
Reset output to terminal |
✅ Tips for Better CSV Exports
Always review the CSV after exporting for formatting.
Use
WHEREinSELECTto export only required rows.Use
ORDER BYto sort data as needed before export.